Set up your SpeechMike or SpeechOne
You have two options to set up dictation hardware with SpeechLive. These options have different advantages and disadvantages, which you can find in detail below. For the best user experience we recommend to use Philips Device Connector (PDC).
Philips Device Connector (PDC)
Philips Device Connector (PDC) is a Google Chrome extension accompanied by a native host application. PDC connects the SpeechLive Wep App with Philips dictation hardware like Foot controls or SpeechMikes.
+ Users don't need to do manual steps to connect the device after browser or computer restarts
+ Users don't need to do manual steps if the device is disconnected
+ Also supports third-party devices
- Users (or their admins) need to install additional components
- No support for ChromeOS
To use Philips Device Connector, you need to install two components:
Philips Device Connector Chrome extension
Philips Device Connector native host application
The following steps cover the installation of both components:
Navigate to the Philips Device Connector extension page in the Chrome web store.
For the next step, choose your browser first:
For the next step, choose your operating system first:
Download the latest Philips Device Connector native host application package here
 and unzip the file.
In the
Windowsfolder of the installation package you'll find the necessaryphilips_device_connector_native_host_installer.exe.Run
philips_device_connector_native_host_installer.exeon your local machine and finish the setup.
Download the latest Philips Device Connector native host application package here
and unzip the file.In the
Macfolder of the installation package you'll find the necessaryphilips_device_connector_native_host_installer.pkg.Run
philips_device_connector_native_host_installer.pkgand finish the setup.
Restart your browser.
Connect the hardware device to your computer.
X You can now control SpeechLive with your hardware device.
See Control SpeechLive with your dictation hardware for more information.
Note
Make sure to use your Philips dictation hardware in Event Mode. This is the default out-of-the-box button mode, however if you changed the button mode of your device you can find more information in the Switch to Event mode section on how to switch it back.
The installation described above is the basic installation every user can do in local working environments. There are also installation methods for IT administrators, e.g. using Group Policies. Please visit the full Philips Device Connector (PDC) installation guide to learn more about advanced installation methods.
If you’re using SpeechLive in virtual environments, you can find more information in the Philips Speech Extensions guide. The guide covers all necessary steps, if you are already familiar with Philips Speech Extensions you can jump right to the Philips Device Connector section. However, we recommend to start with the introduction of the Philips Speech Extensions guide, to cover all the basics of the installation process and the terminology of virtual/remote environments.
Google Chrome
Google Chrome has built in support for Philips dictation hardware like Foot controls or SpeechMikes.
+ No need to install additional components
+ Also works on ChromeOS
- The manual steps below must be performed after each browser or computer restart, as well as when you disconnect/reconnect your hardware (this can be prevented by using policy settings, see Advanced setup)
- Third-party devices are not supported
Connect the hardware device to your computer.
In the Dictations tab, click on the hardware button
 .
.Click on Add device.
The app.speechlive.com wants to connect to a HID device window will open on the left, where you can choose the desired hardware device. Confirm by clicking Connect.
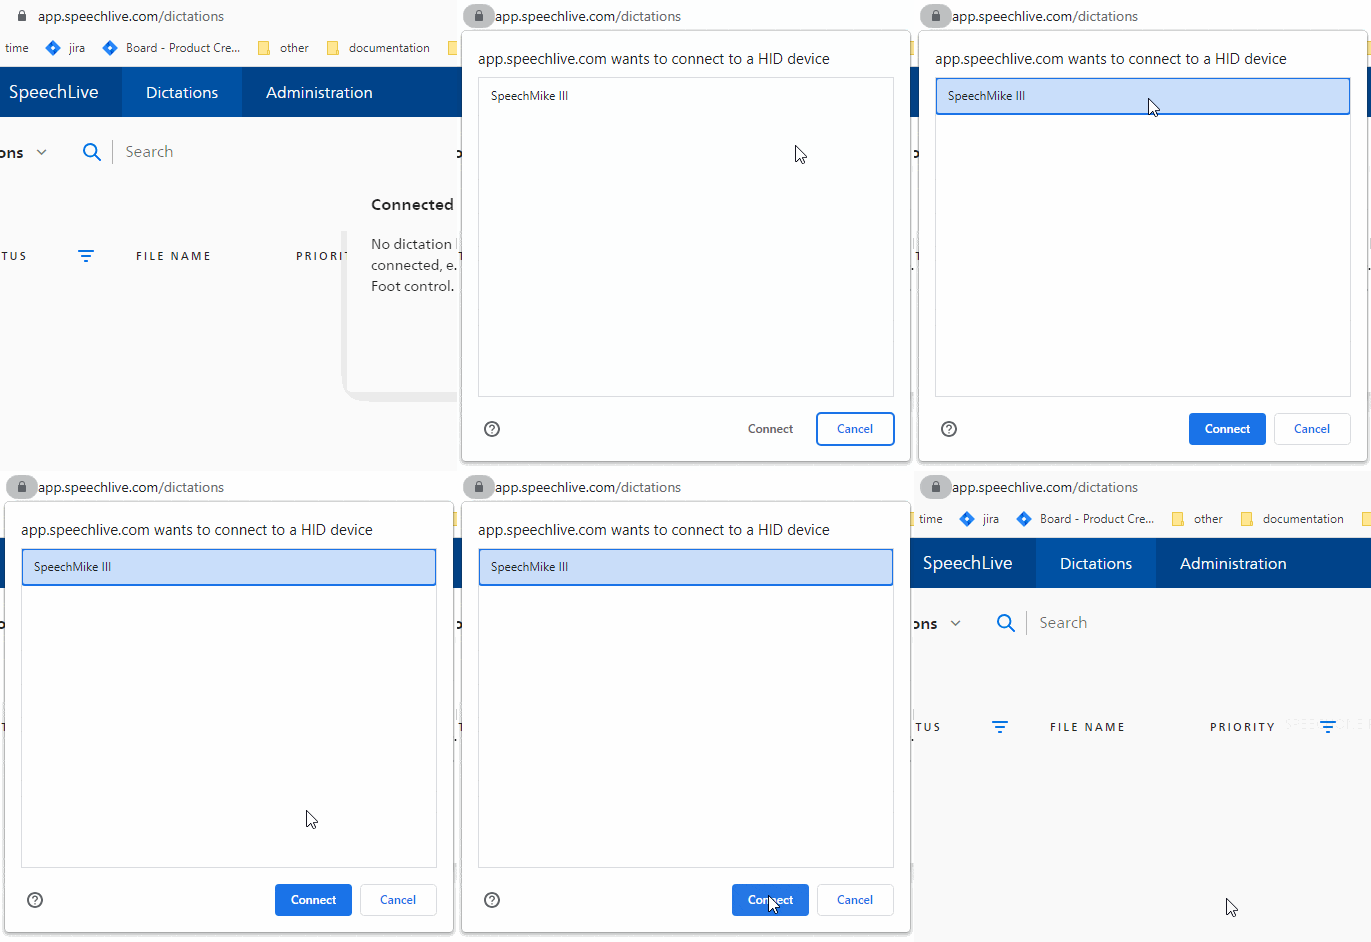
X You can now control SpeechLive with your hardware device.
See Control SpeechLive with your dictation hardware for more information.
Note
Make sure to use your Philips dictation hardware in Event Mode. This is the default out-of-the-box button mode, however if you changed the button mode of your device you can find more information in the Switch to Event mode section on how to switch it back.
The setup above is for end users without advanced user rights on their computer. IT administrators of an organization can also add policy settings for Google Chrome. This way it is no longer necessary for users to manually allow device access each time they start their browser.
Visit the official documentation of Google Chrome for more information on how to set these policies for different operating systems, with different options available for you:
You can use WebHidAllowAllDevicesForUrls to allow all hardware devices for certain URLS, e.g. speechlive.com
You can use WebHidAllowDevicesForUrls to only allow certain devices for certain URLs, e.g. only foot controls for speechlive.com