SpeechLive Health AI Assistant
SpeechLive Health is an AI powered clinical documentation tool that transcribes spoken notes using a medical-specific model, helping healthcare professionals create accurate, structured records during patient interactions.
Create a new SpeechLive Health session
Click the pause button
 to pause and record
  to continue the session.
Click on the Rename button
 to change the name of your session.
 In the My notes section you can add additional basic information about your patient, e.g. the name, age or other important information concerning the session. If possible, SpeechLive Health will additionally display facts and action points during the session which you can edit or remove if necessary.
Once you’re finished, click the pause button
and then on the generate button  in the middle of the screen or on Generate in the upper right.
Select a fitting template for the session and confirm by clicking Generate.
Note
When recording for the first time you need to choose your primary spoken language
Before you can start a session, you may need to confirm the patients consent dialog first, depending on your settings
You can adapt these settings if necessary, see Change the default SpeechLive Health settings
Create a new SpeechLive AI Health session
Click on the AI Assistant tab at the top.
Click the record button
and start dictating or talking to your patient.Use the editor to manually edit the processed document. Changes are automatically saved.
Click on the undo button
 to undo your last text changes. This only works when the session and document is still open. If you switch to a different session or document within a session and return later this is no longer possible.
Click on Copy the upper right to copy the text.
Use the player at the bottom of the screen to play back your session.
Click on the transcript button
 in the lower right to view the transcript of the session. You can also move this button freely on the screen.
Click the pause button to pause and record to continue the session.
Click on the Rename button to change the name of your session. In the My notes section you can add additional basic information about your patient, e.g. the name, age or other important information concerning the session.If possible, SpeechLive Health will additionally display facts and action points during the session which you can edit or remove if necessary.
Once you’re finished, click the pause button and then on the generate button in the middle of the screen or on Generate in the upper right.
Select a fitting template for the session and confirm by clicking Generate.
Tip
You can also select a template in another language if needed. Its also possible to generate a different document from this session, see View and edit your SpeechLive Health session
View and edit your SpeechLive Health session
Once your session is processed you can access it via the session list on the left side by clicking on it.
The session is opened in the editor in the middle of the screen. Here you can:
Use the editor to manually edit the processed document. Changes are automatically saved.
Click on the undo button
to undo your last text changes.Caution
This only works when the session and document is still open. If you switch to a different session or document within a session and return later this is no longer possible.
Click on Copy the upper right to copy the text.
Use the player at the bottom of the screen to play back your session.
Click on the transcript button
in the lower right to view the transcript of the session. You can also move this button freely on the screen.
You can also create multiple documents from your recorded session. In this case, click on Generate at the top right and choose a different template from the list.
Each processed document is displayed as a tab above the editor, allowing you to easily switch between them.
You can choose a different template, but you can’t reuse the ones already used for this session.
Delete a SpeechLive Health session
Hover over the session on the left side of the screen in the session list.
Click on the menu
 and choose Delete. On the next screen confirm by clicking Yes.
Caution
You cannot recover deleted sessions!
Change the default SpeechLive Health settings
You can change some of the settings for SpeechLive Health in your personal settings:
Click on your user name in the upper right corner and choose Personal settings.
Click on the AI Assistant tab and choose the default behavior of SpeechLive Health:
Primary spoken language: Select the language you usually speak during sessions. It should match the language you and your patients use.
Consent: When this function is enabled, you must confirm the patient's consent before recording a new session.
Preferred template: Choose which template appears at the top of the list when you generate a new document.
Use SpeechMike Ambient with SpeechLive Health
You can use a SpeechMike Ambient in conjunction with SpeechLive Health and access the most common functions via the buttons of the device.
Note
To use the buttons you need to first set up your SpeechMike Ambient, visit Set up your dictation hardware to learn more about the necessary steps.
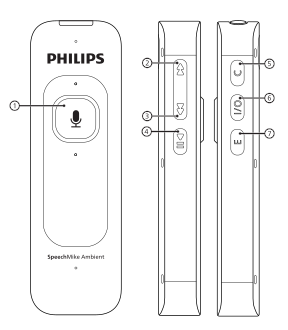 |
No. | Button description | Assigned function |
|---|---|---|
1 | Record | Start/pause recording (when creating a new session) |
2 | >> (Fast Forward) | During playback: Fast Forward During the Generate a document dialog: Move up the list |
3 | << (Rewind) | During playback: Rewind During the Generate a document dialog: Move down the list |
4 | Play/Pause | During playback: Play/Pause |
5 | C | Start a new session |
6 | I/O | - |
7 | E | Open the Generate a document dialog During the Generate a document dialog: Generate selected template. |
Use SpeechLive Health in the Mobile App
You can use SpeechLive Health also in the SpeechLive Mobile App. See Installation on how to install the Mobile App on your device.
Create a new SpeechLive Health session
Tap on SpeechLive at the top of the screen and choose AI Assistant in the menu.
Tab on the
button in the lower right corner to start a new session.Tab the record button
 and start dictating or talking to your patient.
Tab the pause button
to pause and record to continue the session.Once you’re finished, click the pause button
and then on the generate button in the lower right.Select a fitting template for the session and confirm by clicking Generate.