![[Note]](/fileadmin/helpdesk-paligo/en/../css/image/note.png) | Note |
|---|---|
Microsoft changed the name from Azure Active Directory to Microsoft Entra ID. |
This tutorial describes the steps you need to perform in both Philips SpeechLive and Microsoft Entra ID to configure automatic user provisioning. When configured, Entra ID automatically provisions and deprovisions users to Philips SpeechLive. For important details on what this service does, how it works, and frequently asked questions, see the following article.
Create users in Philips SpeechLive
Remove users in Philips SpeechLive when they no longer require access
Keep user attributes synchronized between Microsoft Entra ID and Philips SpeechLive
The scenario outlined in this tutorial assumes that you meet the following prerequisites:
A user account in Microsoft Entra ID with permission to configure provisioning (e.g. Application Administrator, Cloud Application administrator, Application Owner, or Global Administrator).
A Philips SpeechLive account administrator user
A Philips SpeechLive Enterprise plan with a sufficient number of users
To configure the integration of Philips SpeechLive into Microsoft Entra ID, you need to add and configure a new enterprise application:
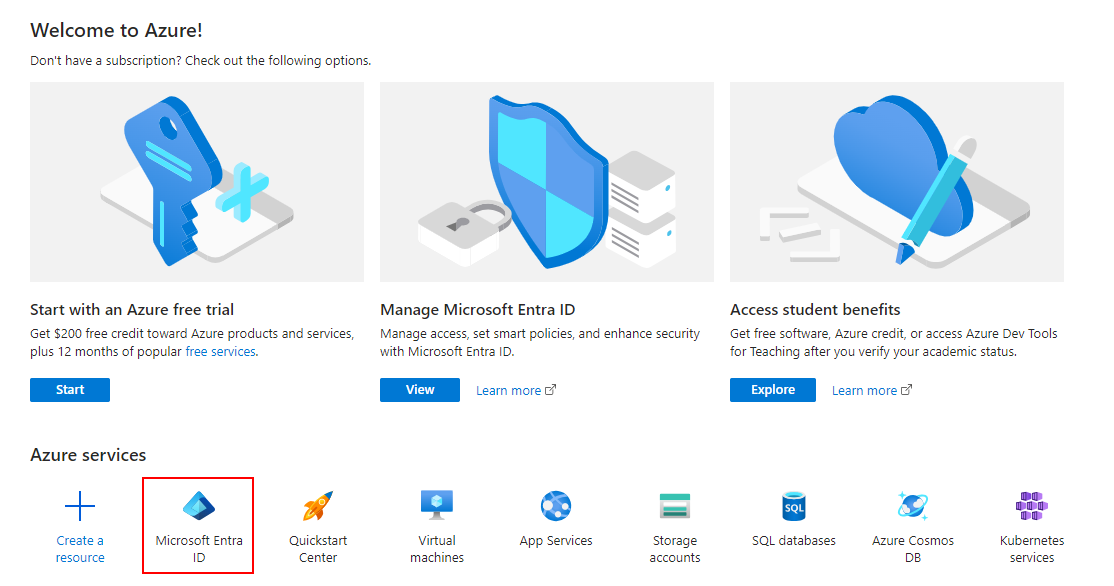
Go to portal.azure.com and choose Microsoft Entra ID in the list of available services.
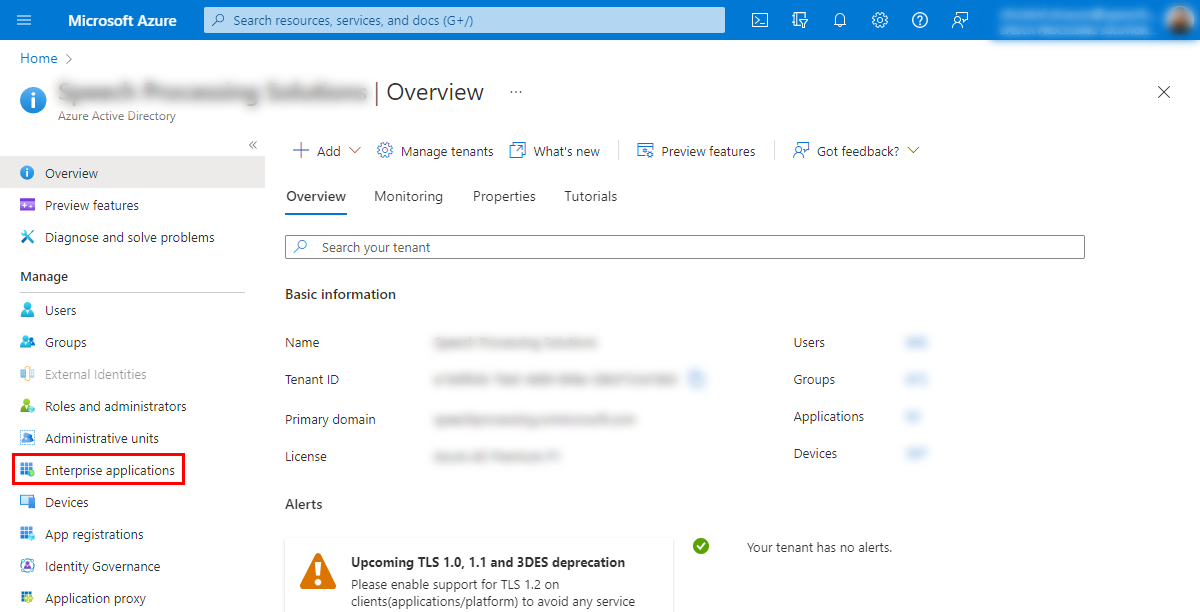
Choose Enterprise applications on the left of the screen.
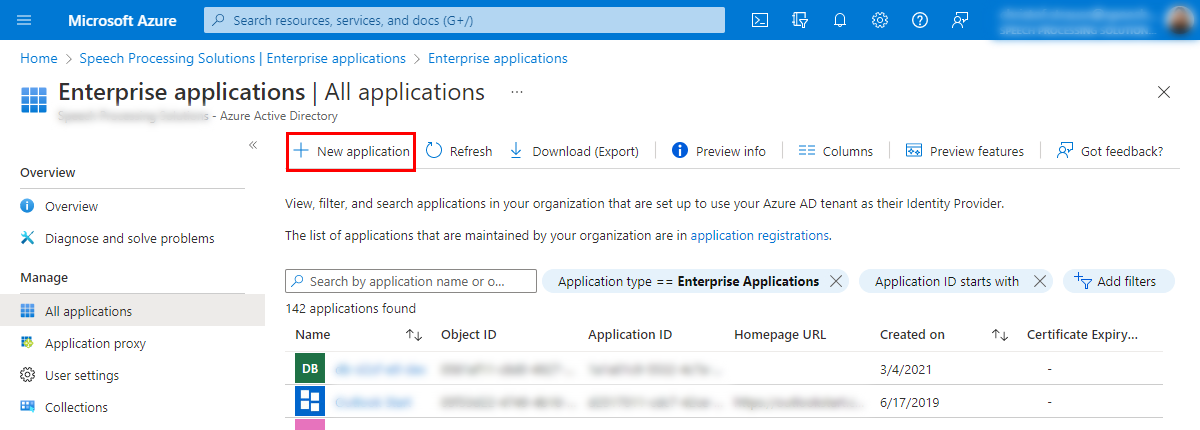
On top of the screen click on New application.
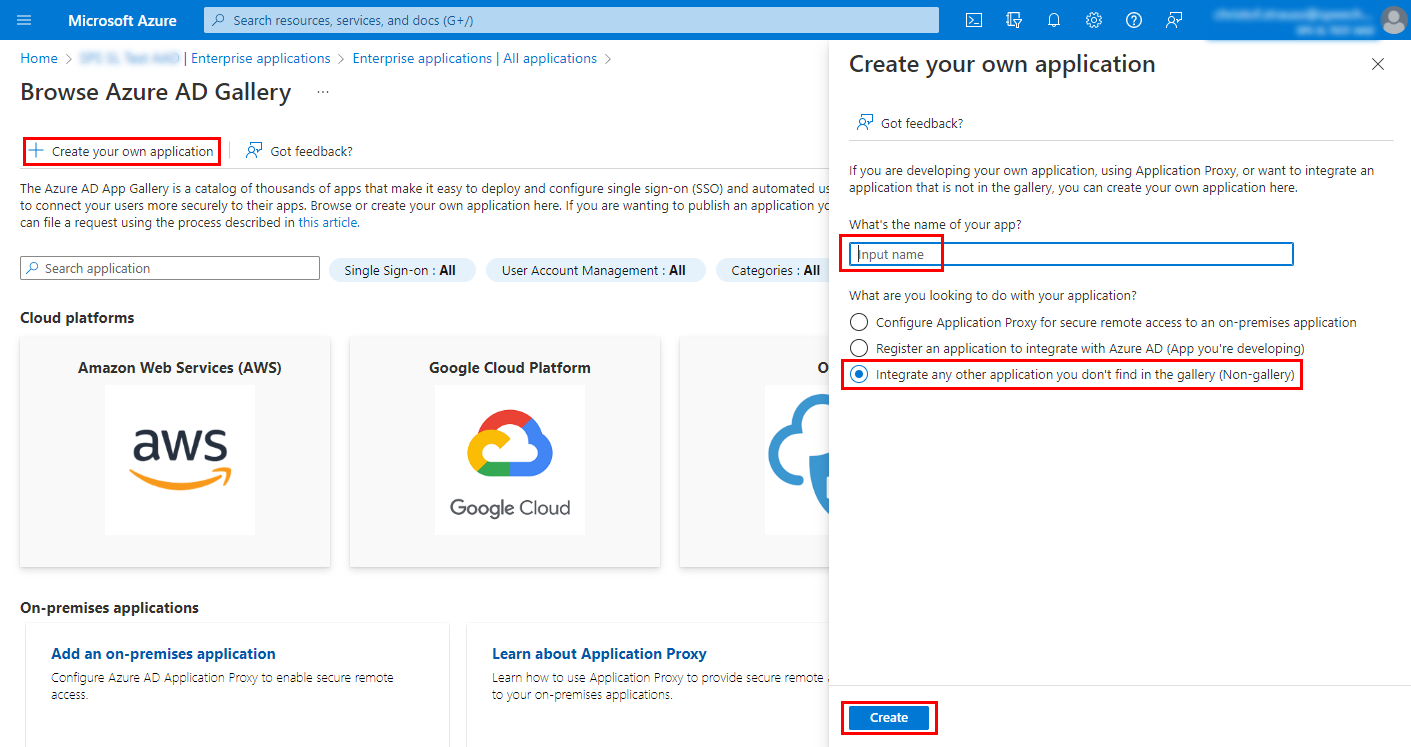
On the next screen click on Create your own application. Enter a name for the application on the right side of the screen and choose the Integrate any other application you don't find in the gallery (Non-gallery) option. Confirm by clicking Create.
![[Note]](/fileadmin/helpdesk-paligo/en/../css/image/note.png)
Note When choosing a name, do not use Speech or SpeechLive. You need to set a different name for the application.
If you enter Speech or SpeechLive when setting a name, Philips SpeechLive will appear in the list of gallery applications. Do not select Philips SpeechLive from this list, set a different name for the application, and continue the setup as described below.
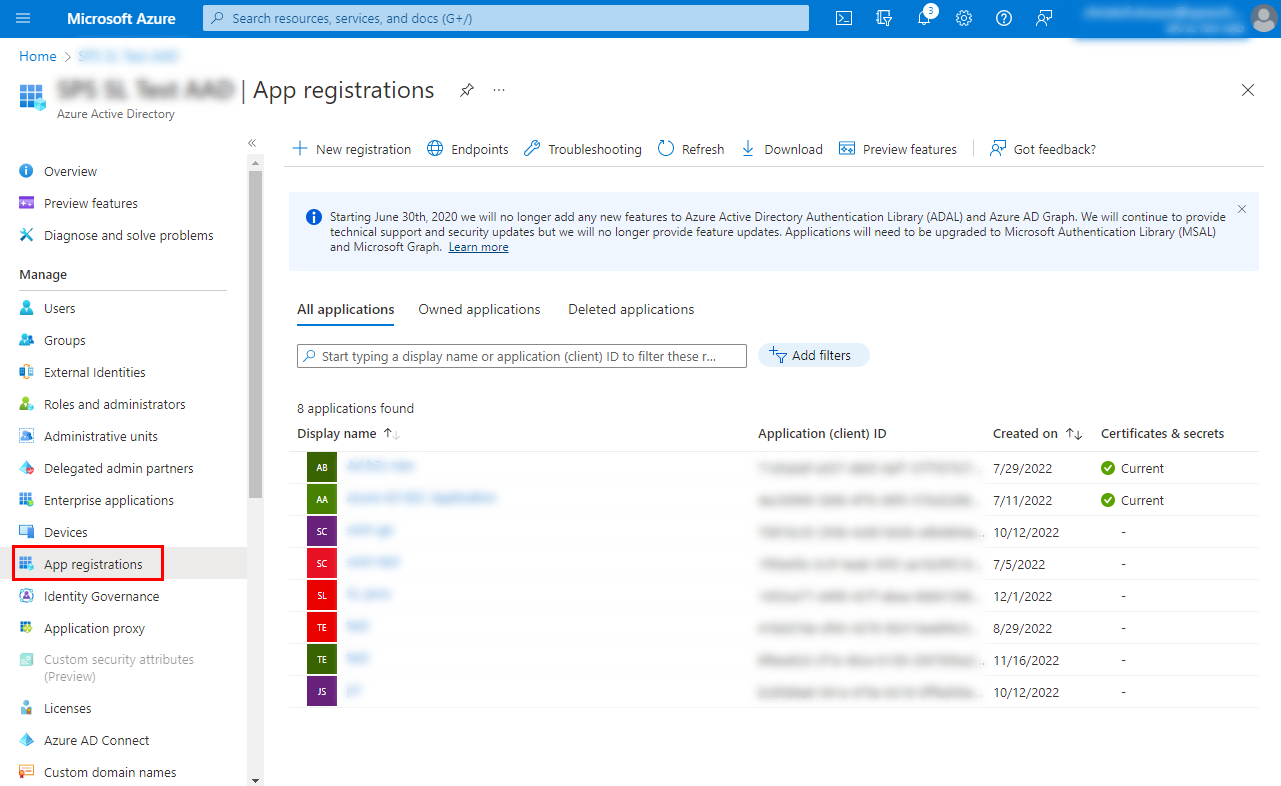
Return to Microsoft Entra ID and click on App registration on the left side, on the next screen click on the app you just created (you may need to choose All applications first).
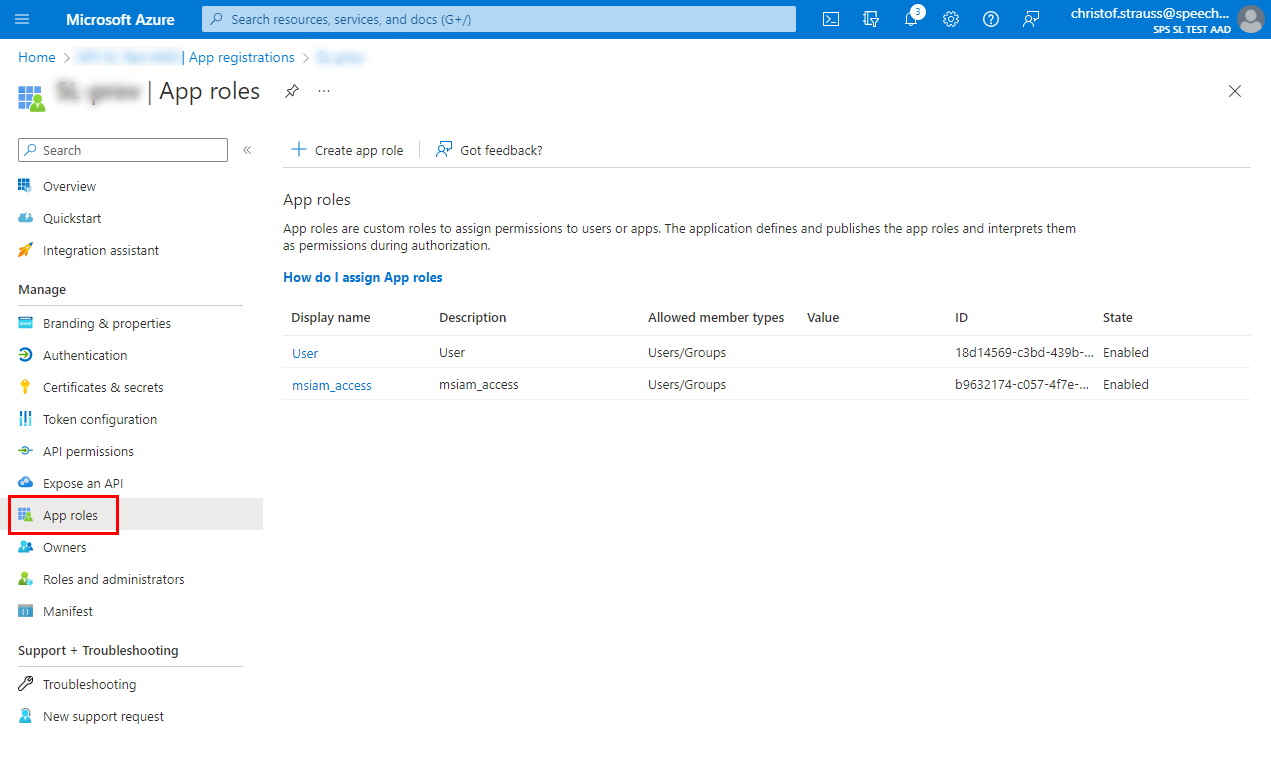
Click on App roles on the left side of the screen
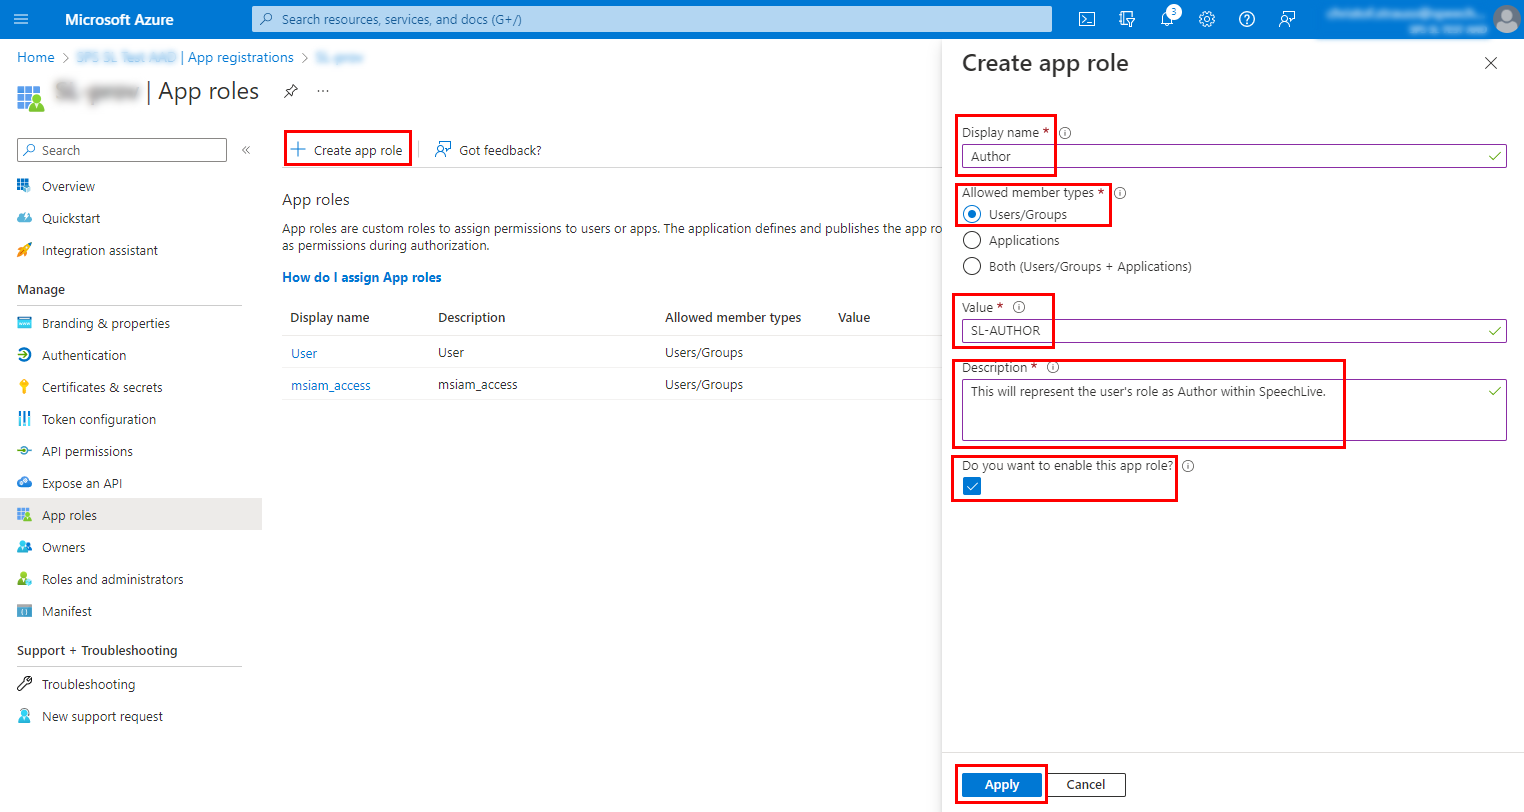
Click on Create app role on top of the screen, next enter the following information for the new role:
Display name: Enter "Author"
Allowed member types: Choose Users/Groups
Value: Enter "SL-AUTHOR"
Description: Enter "This will represent the user's role as Author within SpeechLive."
Activate the Do you want to enable this app role? checkbox.
Save the role by clicking on Apply.
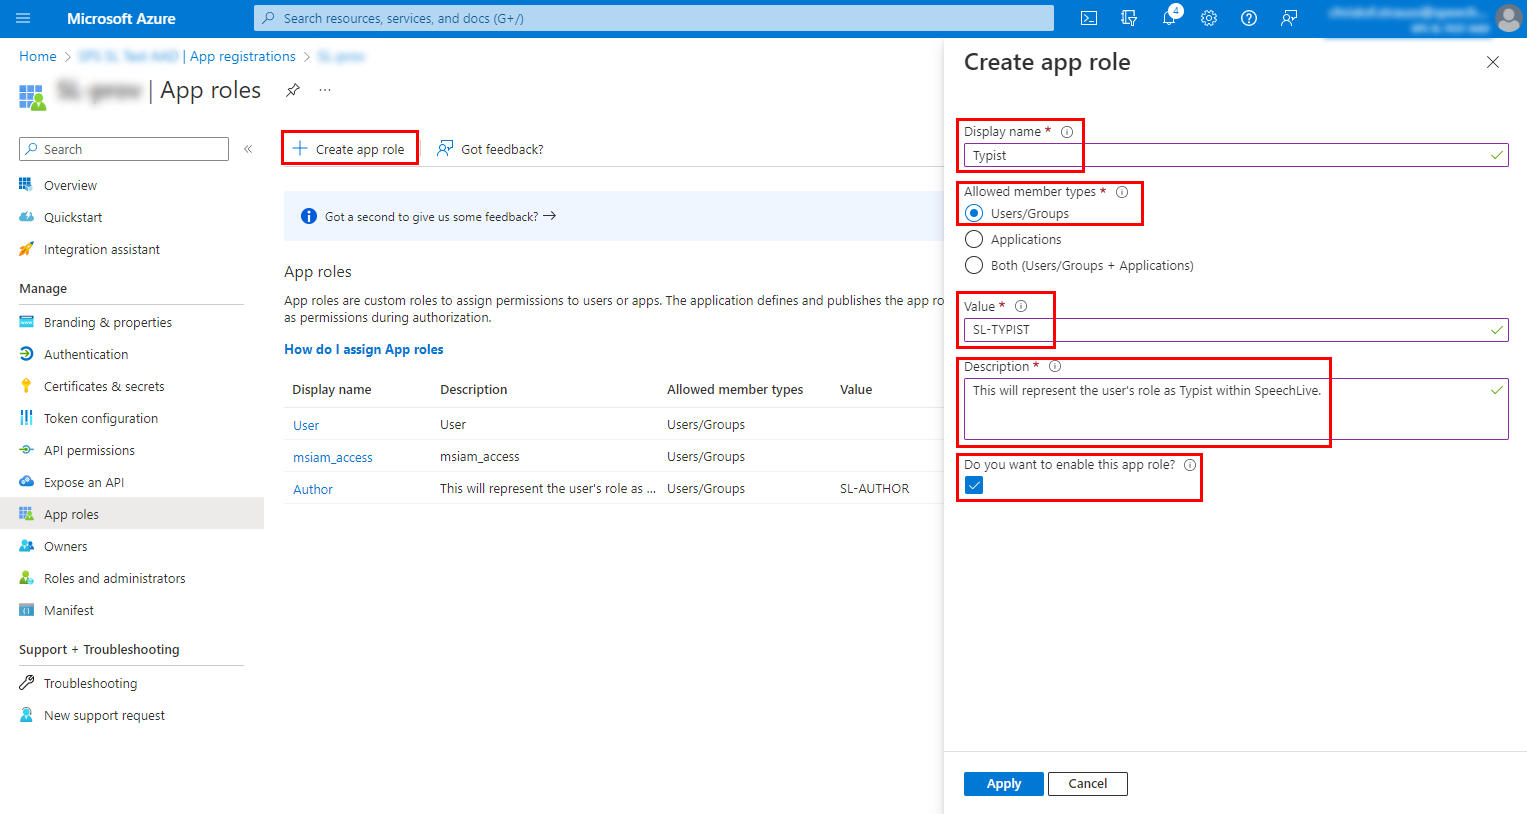
Now you need to add a second role, again by clicking on Create app role first and than entering the following information:
Display name: Enter "Typist"
Allowed member types: Choose Users/Groups
Value: Enter "SL-TYPIST"
Description: Enter "This will represent the user's role as Typist within SpeechLive."
Activate the Do you want to enable this app role? checkbox.
Save the role by clicking on Apply.
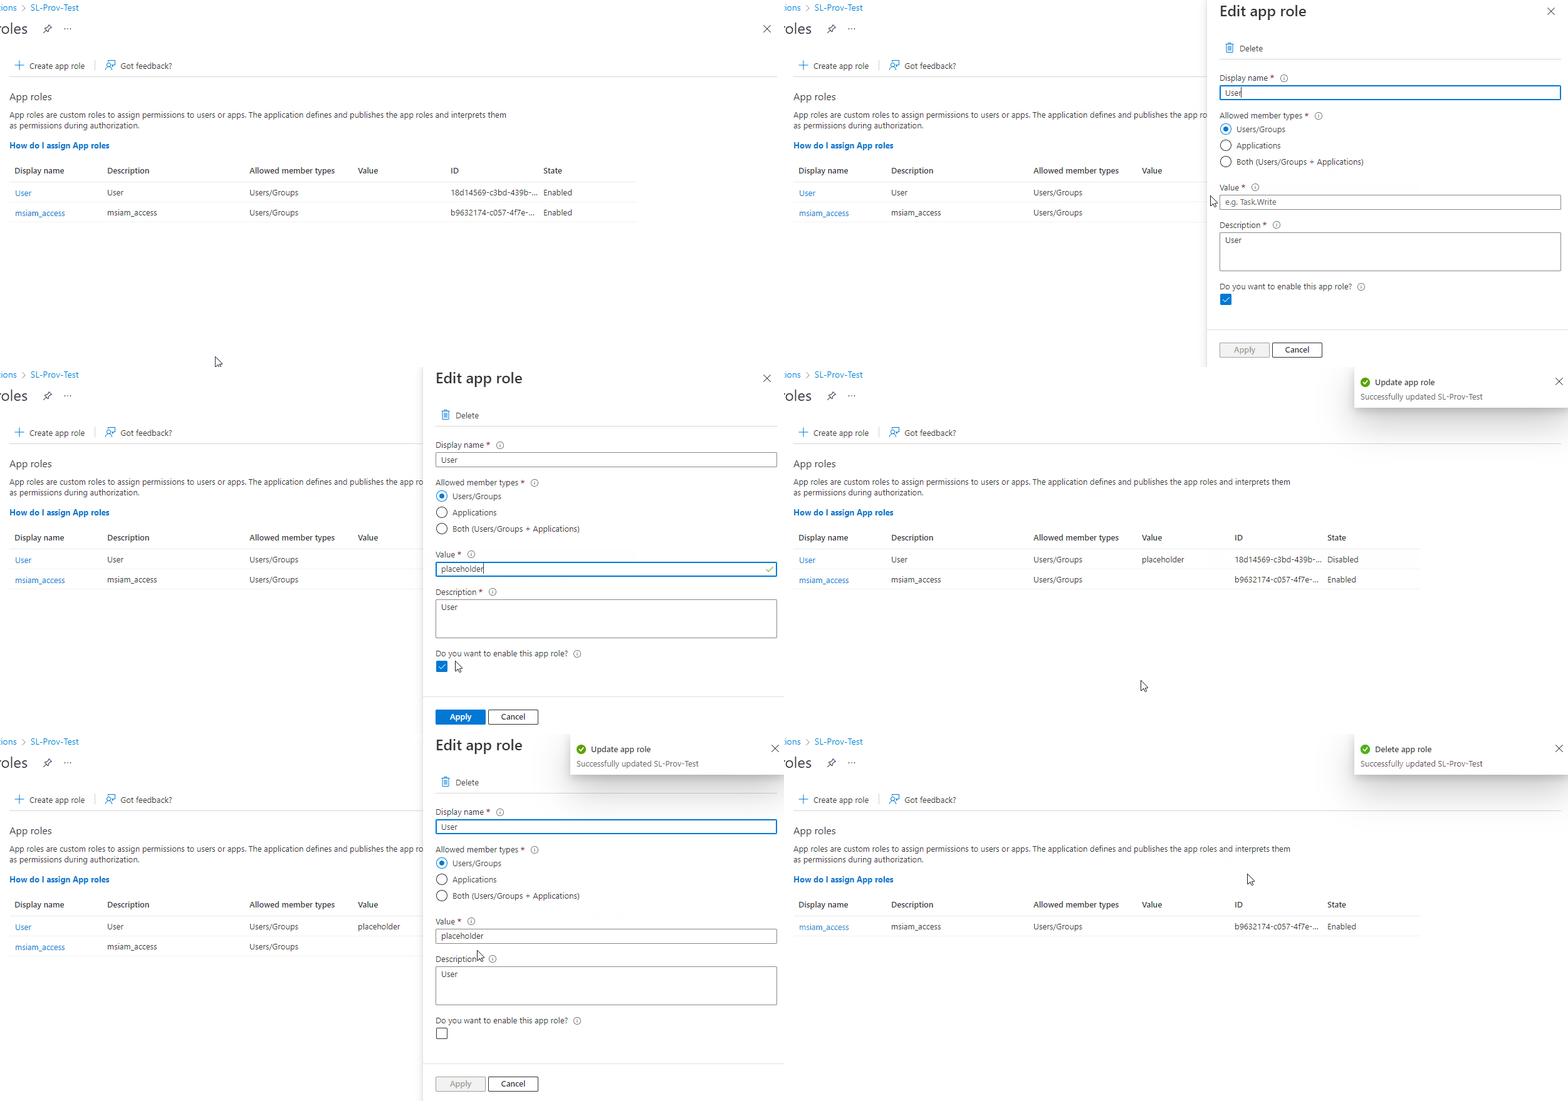
Now delete the two roles that are added per default, User and msiam_access.
Click on the role, on the right enter a placeholder text in the Value field, then you are able to deactivate the Do you want to enable this app role? checkbox. Click Apply, now open the user again and you can delete it by clicking Delete at the top.
First, you need to activate user provisioning in SpeechLive and access the necessary credentials:
Go to www.speechlive.com/app and sign in as SpeechLive account administrator (see User roles for more information).
Navigate to the Administration tab, click on More... and select Developers.
Activate Enable Active Directory Provisioning, now you can access the Tenant URL and the Secret Token.
Activate Enable Microsoft Entra ID Provisioning, now you can access the Tenant URL and the Secret Token.
↪ You need the Tenant URL and the Secret Token for the next steps, where you activate user provisioning in Microsoft Entra ID.
Activate and configure provisioning in Microsoft Entra ID:
Go to portal.azure.com, choose Microsoft Entra ID in the list of available services and next choose Enterprise applications on the left of the screen. Now choose the application you created before in the list.
Click on Provisioning on the left side of the screen, on the next screen click on Get started.
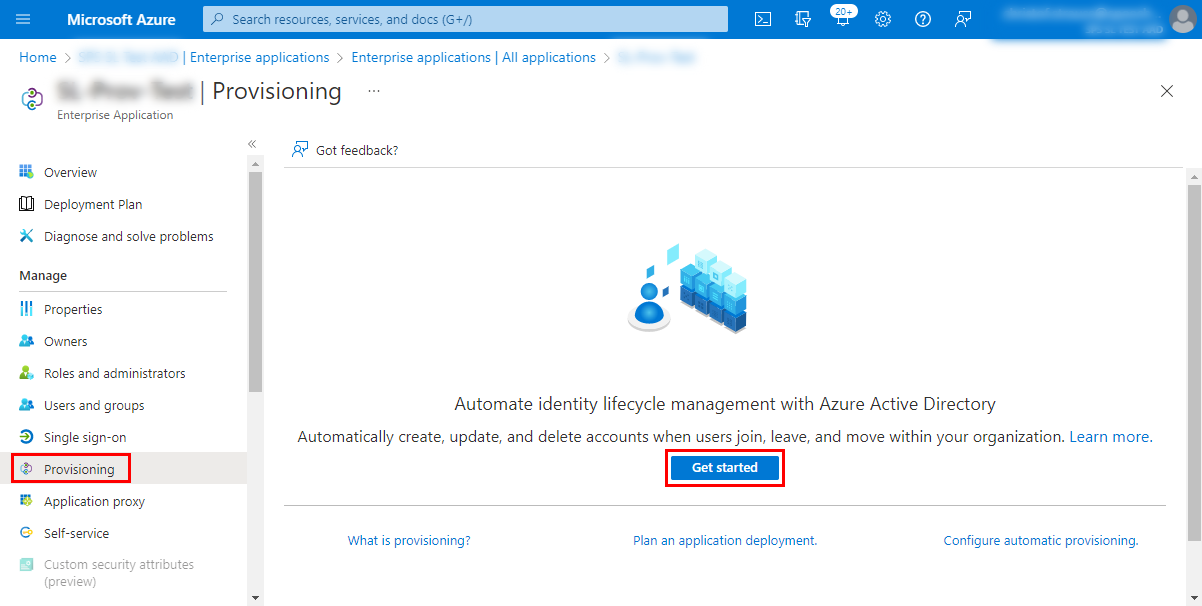
On the Provisioning screen, you need to change the following settings:
Set the Provisioning Mode to Automatic.
In the Admin Credentials section, enter the Tenant URL and the Secret Tokenyou copied from SpeechLive.
↪ After entering both the Tenant URL and the Secret Token, click on Test connection and you should see a confirmation in the upper right corner.
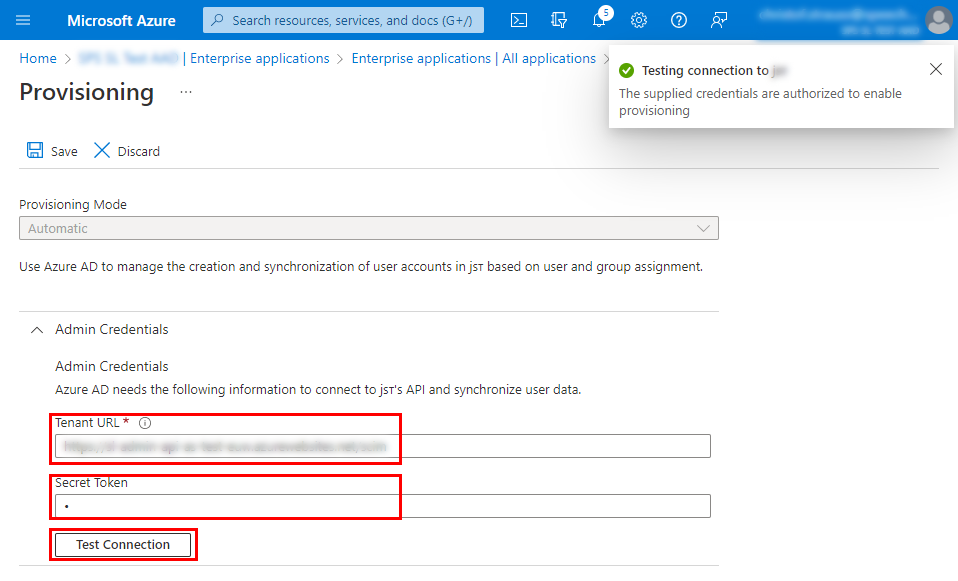
Click Save on the top of the screen, next click on Enterprise applications | All applications on top to exit this screen (this is necessary to get access to all available settings). Now choose again the application you created before in the list.
Click on Provisioning on the left side of the screen, on the next screen click on Edit provisioning.
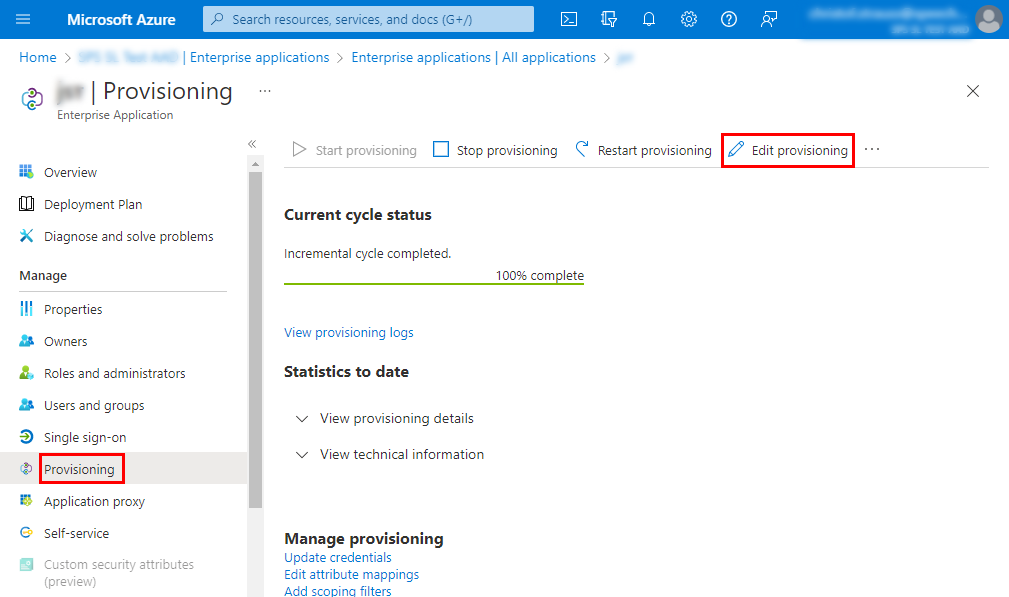
In the Settings section, we recommend to activate the Send an email notification when a failure occurs and enter an email address which should get the notifications.
Also in the Settings section, make sure to set the Scope option to Sync only assigned users and groups.
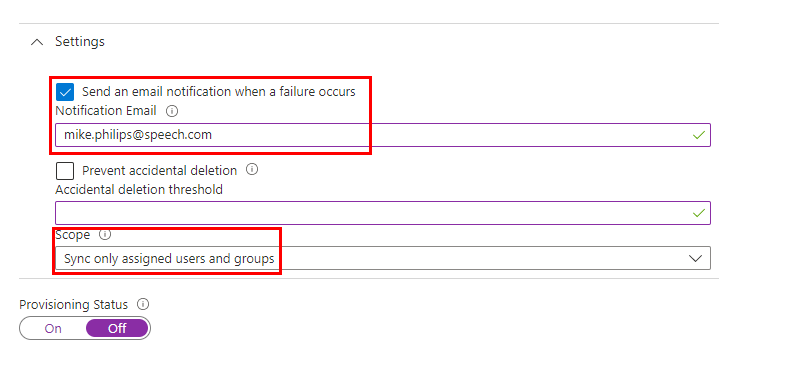
For the moment you should set the Provisioning status at the bottom to Off. Now you can save your current settings by clicking on Save at the top of the page.
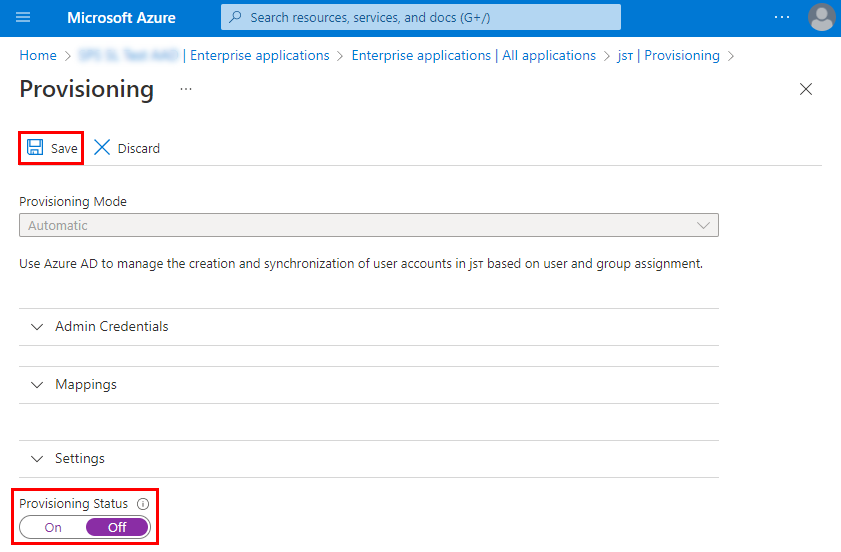
Now you can continue to set up provisioning. The following steps show you how to delete some of the default mappings, create new application attributes and add new mappings.
On the Provisioning screen, open the Mappings section and select Provision Azure Active Directory Groups.
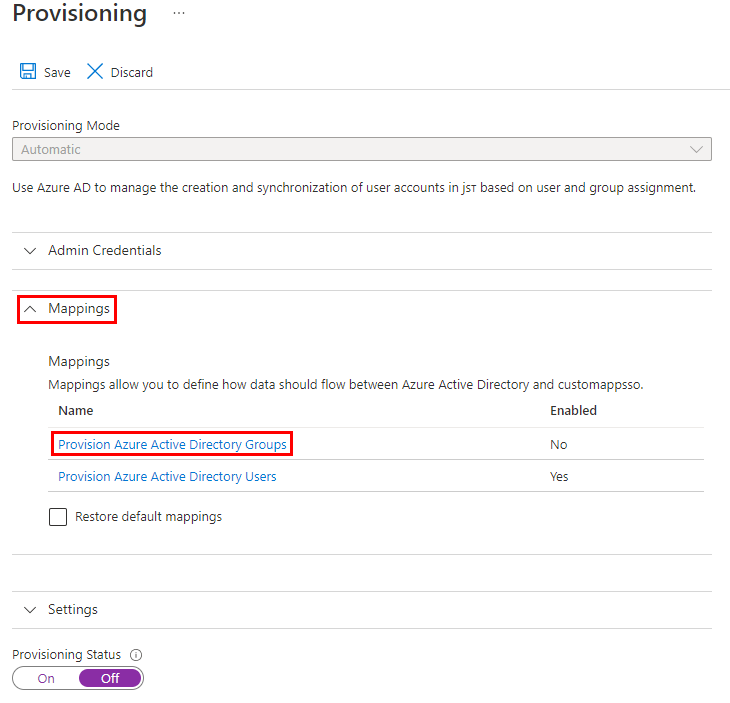
On the next screen, set the Enabled option to No and click on Save at the top of the screen. Now return to the Provisioning screen.

On the Provisioning screen, open the Mappings section and select Provision Azure Active Directory Users.
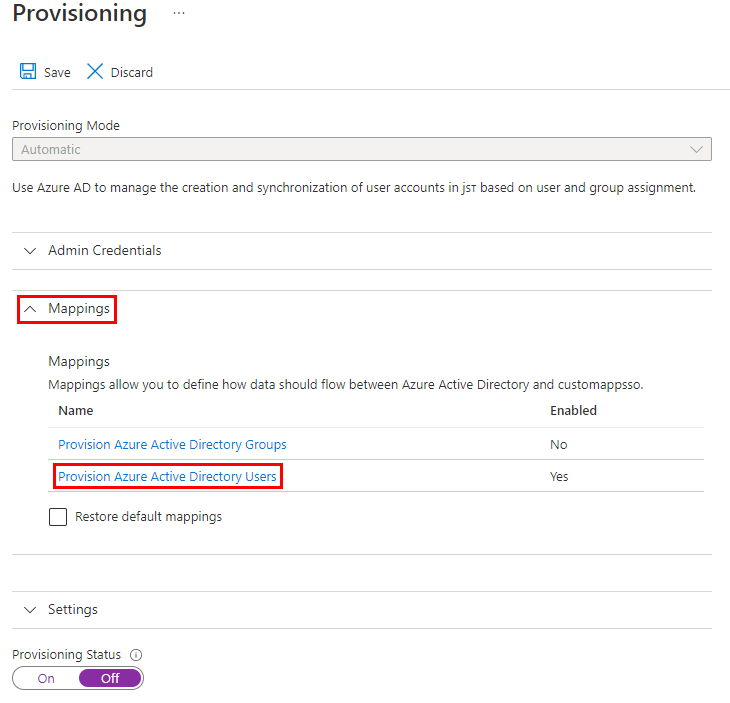
Scroll down to the Attribute Mappings section and delete all mappings except:
userPrincipalName
Switch([IsSoftDeleted], ,"False","True","True","False")
displayName
Activate Show advanced options at the bottom of the page and click Edit attribute list for customappsso.
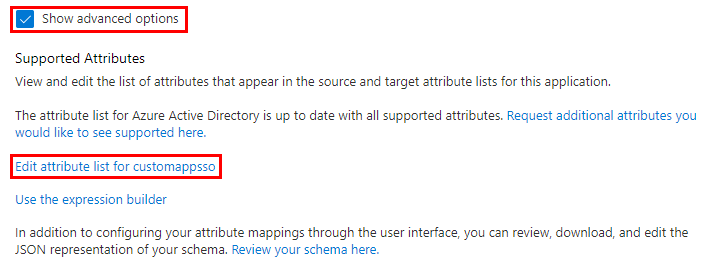
On the Edit Attribute List screen, scroll to the bottom and enter the following information to add a new entry:
Name: Enter: "roles"
Type: Choose String in the list
Primary Key?: Leave empty
Required?: Leave empty
Multi-Value?: Activate the checkbox
Exact case?: Leave empty
API Expression: Leave empty
Referenced Object Attribute: Leave empty

Click on Save at the top of the screen (you may also need to confirm the changes).
Back at the Attribute Mapping screen, scroll back down and click on Add New Mapping.

On the Edit Attribute screen, enter the following information:
Mapping type: Choose Expression in the list
Expression: Enter: "AppRoleAssignmentsComplex([appRoleAssignments])"
Default value if null (optional): Leave empty
Target attribute: Select roles (the one you created before)
Match objects using this attribute: Select No
Matching precedence: Leave value at 0
Apply this mapping: Select always
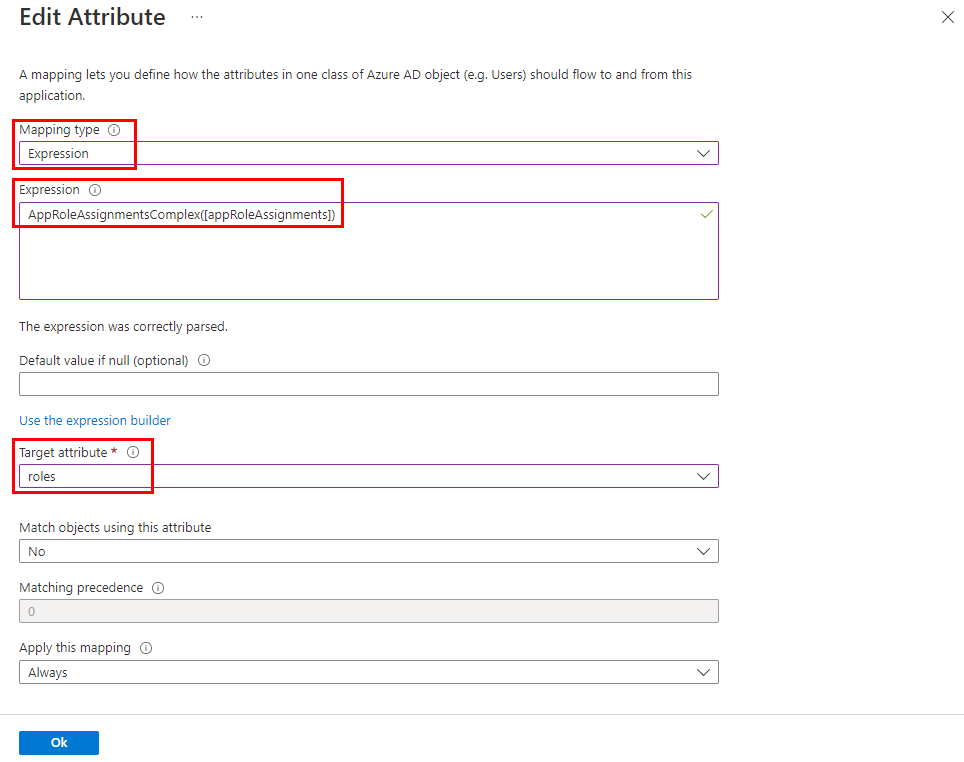
Click Ok at the bottom of the screen, back on the Attribute Mapping screen, click Save at the top of the screen to save all the changes you made.
Return to the Provisioning screen and change the Provisioning status at the bottom of the page to On. Now click on Save at the top of the screen.
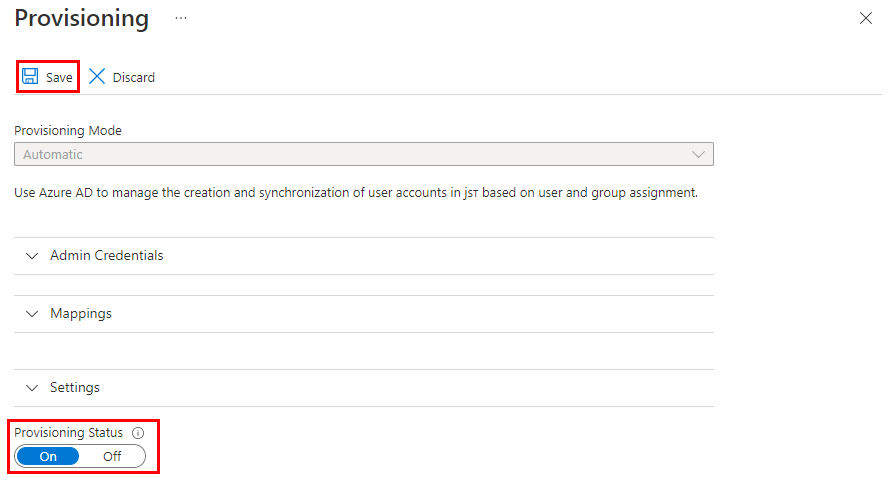
↪ Next you need to assign the users which should be provisioned to Philips SpeechLive.
When setting up user provisioning, the scope was intentionally set to only sync assigned users and groups, so you can select which of your users should be provisioned to SpeechLive. In this step you learn how to assign existing users from Microsoft Entra ID to SpeechLive and how to set their role (author or typist).
Go to portal.azure.com, choose Microsoft Entra ID in the list of available services and next choose Enterprise applications on the left of the screen. Now choose the application you created before in the list.
Choose Users and groups on the left side, on the next screen click on Add user/group on top of the screen.
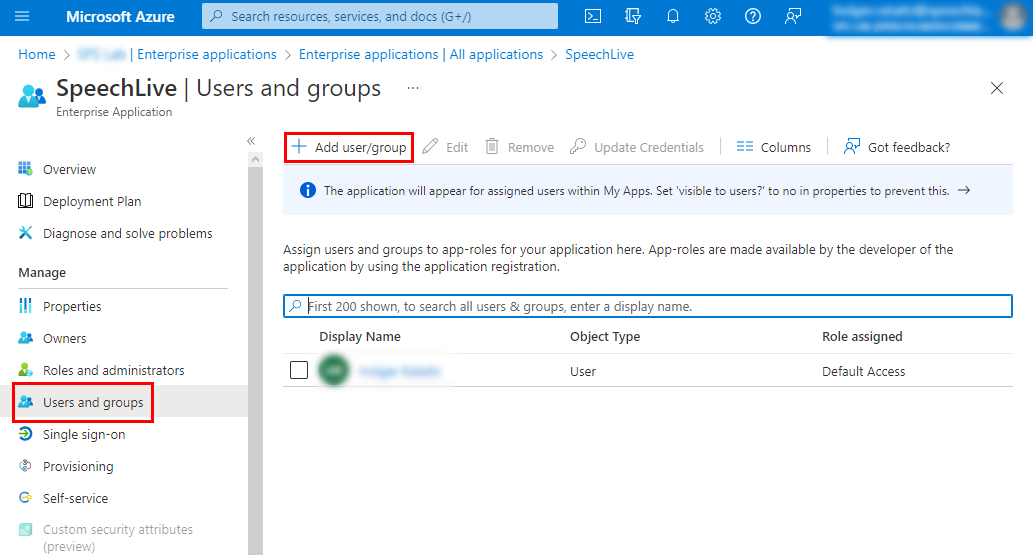
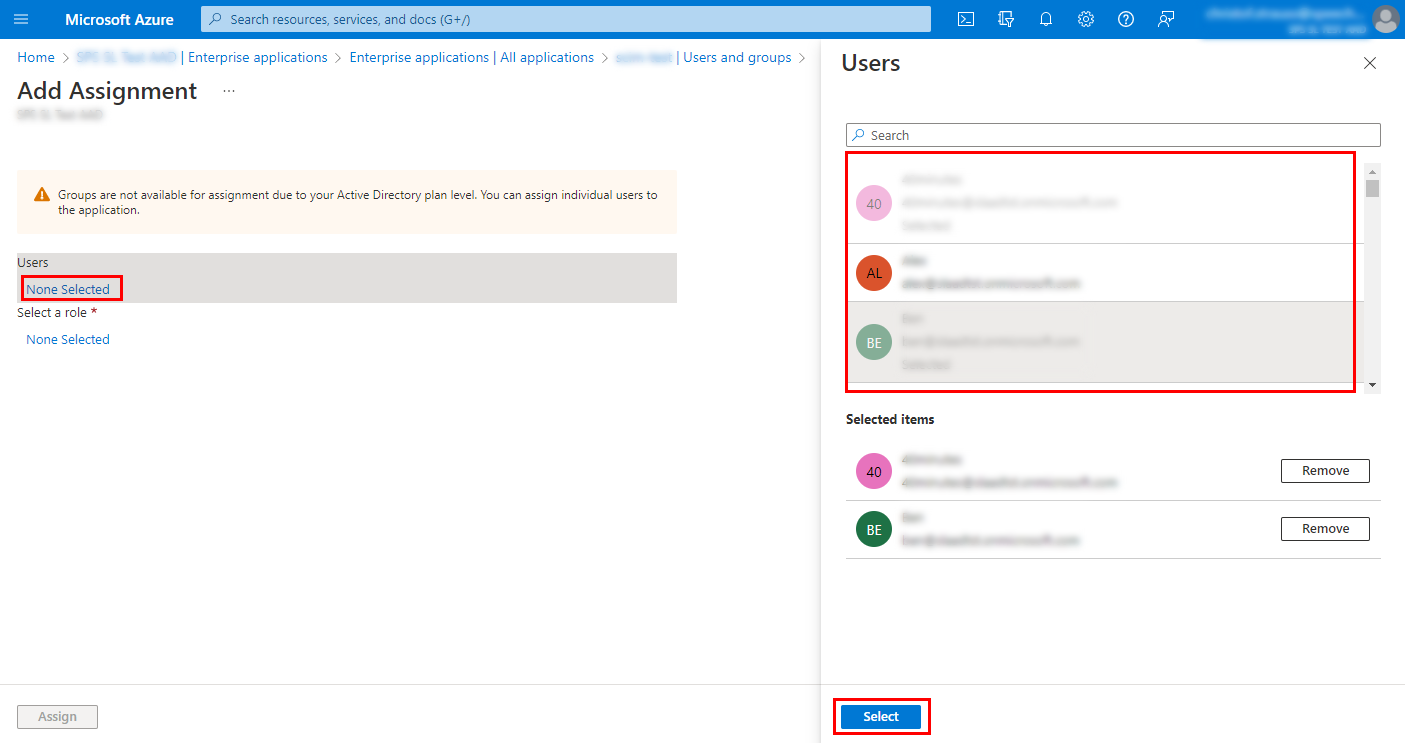
On the Add Assignment screen, click on None selected in the Users section. Now you can choose the users on the right side, for which you want to set a specific role, e.g. author or typist. Confirm your selection by clicking on Select.
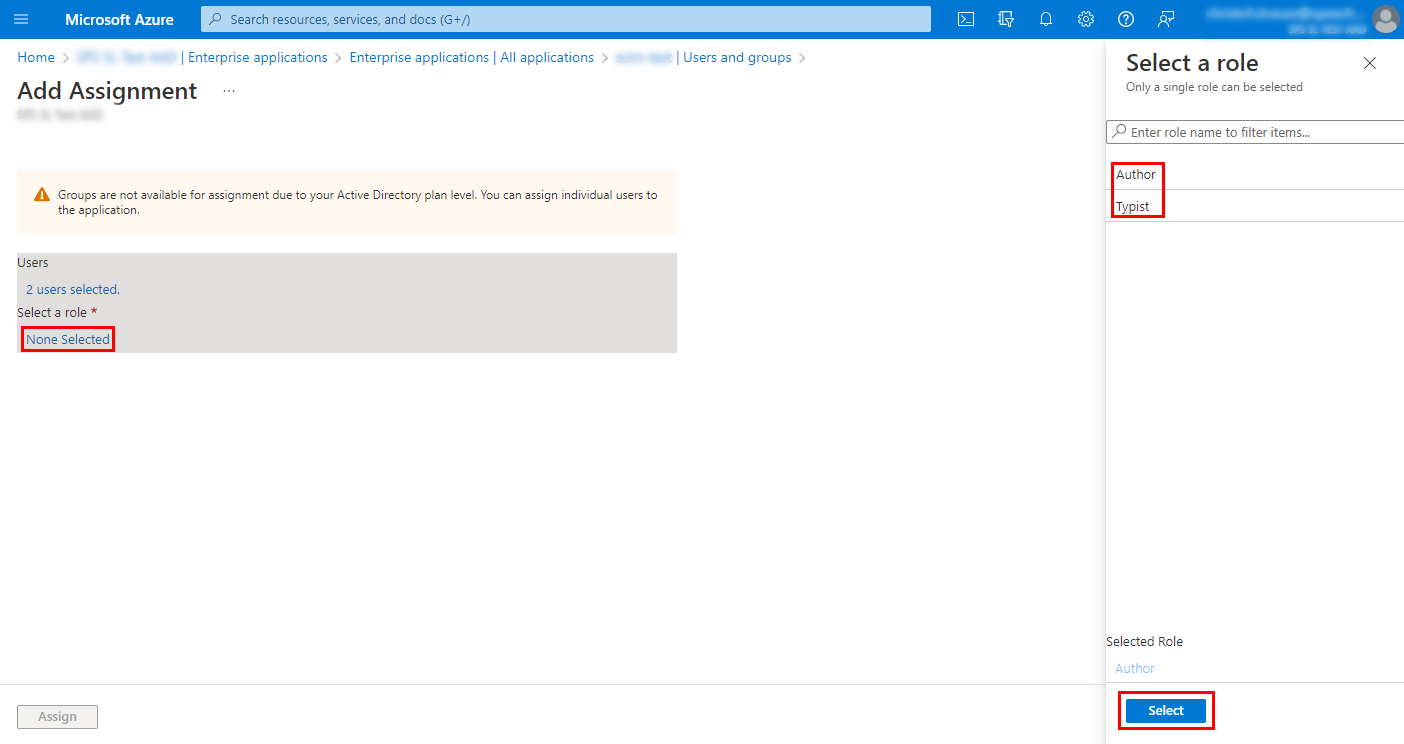
In the Select role section, click on None selected and choose on the right side either Author, or Typist, depending which role you want to assign to the users you selected before. Confirm your selection by clicking on Select.
![[Note]](/fileadmin/helpdesk-paligo/en/../css/image/note.png)
Note You can only assign one role to a user, its not possible to assign the author as well as the typist role to the same user.
Once provisioned, its not possible to change the role later in Microsoft Entra ID. In this case we recommend to Soft delete a user and add the user again.
Confirm your settings by clicking on Assign at the bottom of the screen.
You will now see the users listed as well as their assigned role. Those users are now ready for provisioning and will be migrated in approximately 40 minutes when the provisioning service runs.
After provisioning users you may want to check the status of the provisioning or access further information for troubleshooting:
Go to portal.azure.com, choose Microsoft Entra ID in the list of available services and next choose Enterprise applications on the left of the screen. Now choose the application you created before in the list.
Click on Provisioning on the left side of the screen, on the next screen you can see the status of the provisioning.
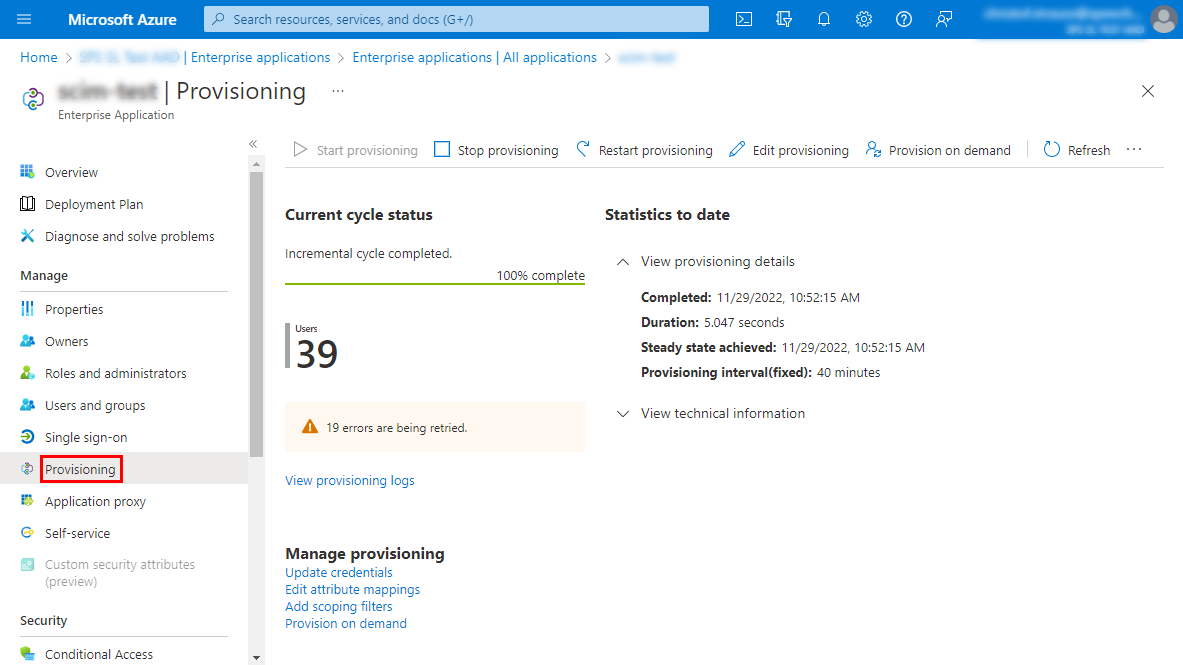
Here you can see when the provisioning was completed the last time and various other information.
Click on View provisioning logs to open the logs about the migrated users. You can also check here if users where migrated to Philips SpeechLive, updated or if any errors occurred.

Soft deleting a user means that you remove it from the added users list. The next time the provisioning service runs (which may take up to 40 minutes), the user will then be removed from SpeechLive (if no dictations are assigned to the user). If dictations are assigned to the user, the user will be deactivated in SpeechLive (set to the status Invited). The SpeechLive account administrator must delete the user manually in SpeechLive.
Go to portal.azure.com, choose Microsoft Entra ID in the list of available services and next choose Enterprise applications on the left of the screen. Now choose the application you created before in the list.
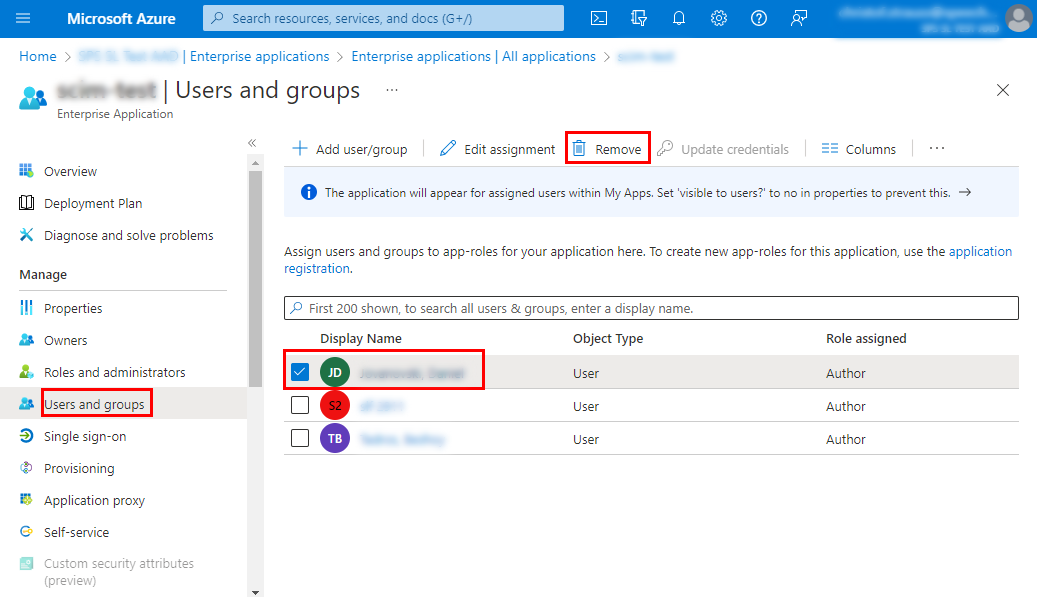
Click on Users and groups on the left side of the screen, now select the user which you want to delete and confirm by clicking Remove at the top of the screen.
Hard deleting a user means that you delete the user in Microsoft Entra ID. The next time the provisioning service runs (which may take up to 40 minutes), the user will then be removed from SpeechLive (if no dictations are assigned to the user). If dictations are assigned to the user, the user will be deactivated in SpeechLive (set to the status Invited). The SpeechLive account administrator must delete the user manually in SpeechLive.
Disabling a user means that the user will no longer be able to sign into Microsoft Entra ID. The next time the provisioning service runs (which takes up to 40 minutes), the user will then be deactivated in SpeechLive (set to the status Invited).
Go to portal.azure.com, choose Microsoft Entra ID in the list of available services and next choose Enterprise applications on the left of the screen. Now choose the application you created before in the list.
Click on Users and groups on the left side of the screen, next click on the name of the user you want to edit.
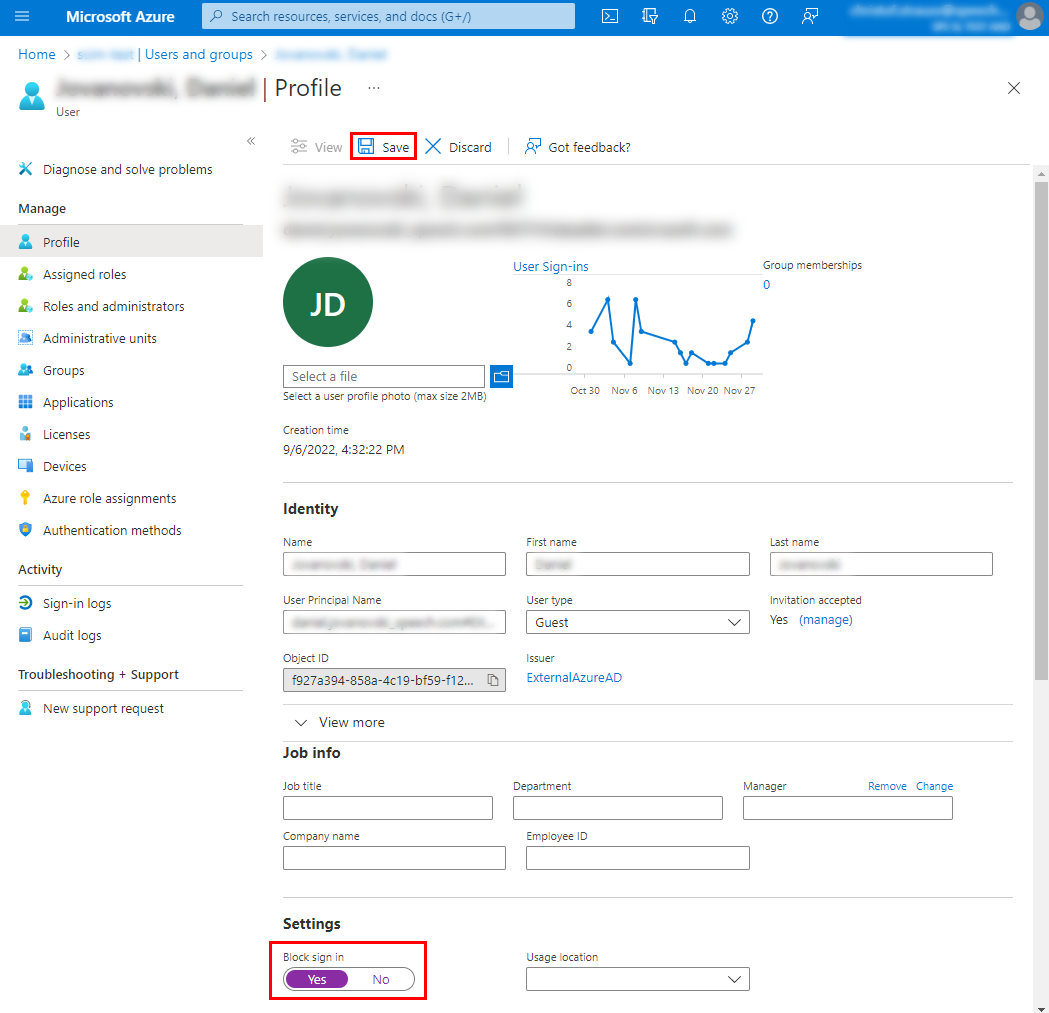
On the user Profile screen, click on Edit on top of the screen.
Scroll down to the Settings section and set the Block sign in switch to Yes. Confirm by clicking Save at the top of the screen.
Provision on demand allows you to provision settings for specific users without the need to wait until the provisioning service runs (which takes up to 40 minutes). The main difference is that provisioning on demand only provisions the settings for a specific user, whilst the regular provisioning applies changes made to all users.
Go to portal.azure.com, choose Microsoft Entra ID in the list of available services and next choose Enterprise applications on the left of the screen. Now choose the application you created before in the list.
Click on Provisioning on the left side of the screen, on the next screen click on Provision on demand on the top of the screen.
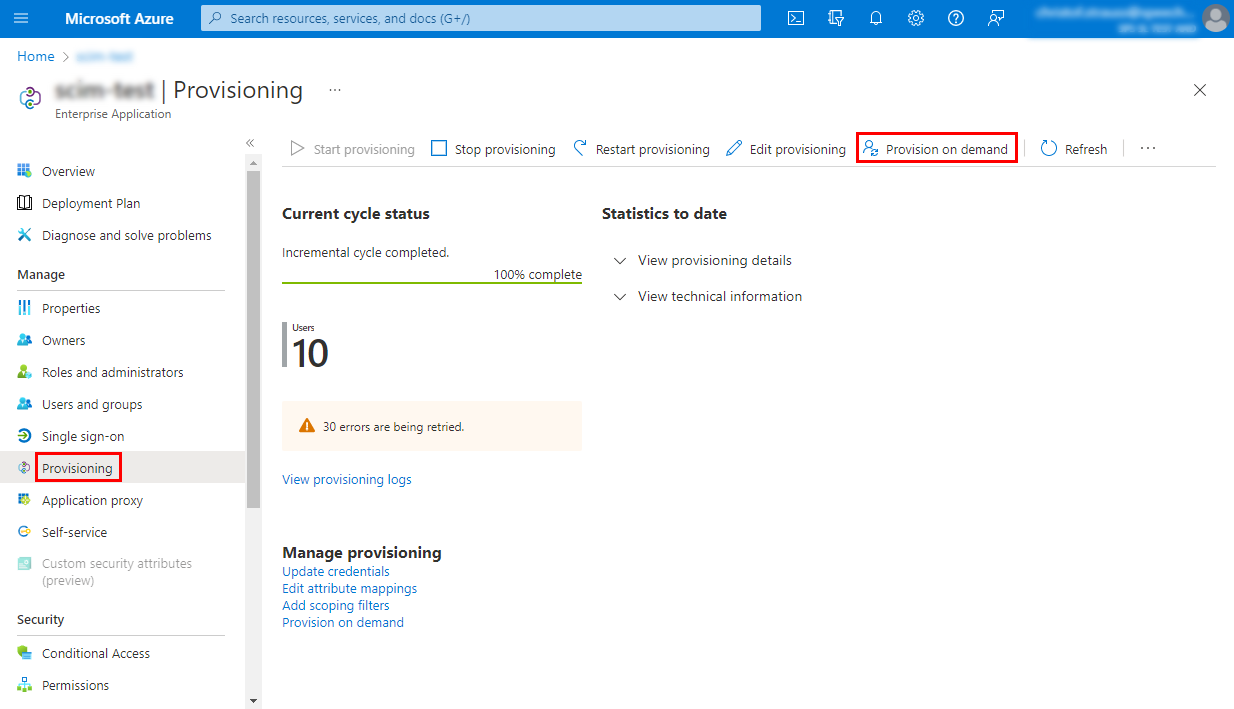
On the next screen, search for the user you want to apply the changes you made previously. Confirm by clicking on Provision.
After the user was provisioned, Azure will you give you an overview of the provisioning workflow, including errors if something did not work.
When soft or hard deleting a user that still has dictations assigned in SpeechLive, this user will only be deactivated in SpeechLive (set to the status Invited). The SpeechLive account administrator must delete the user manually in SpeechLive.
Once a role was set for a user, it’s not possible to update it later (e.g. change a typist to an author).
If you add a user with a specific role, e.g. an author, it’s not possible to add the same user with a different role, e.g. typist.
It is possible to add and provision users outside of your tenant (external identities). However, they will not be able to sign in to SpeechLive. We recommend to not add external identities.
When you manually delete a workflow user in SpeechLive, but provision the same user later again via Microsoft Entra ID, then this user will not be created in SpeechLive. Use Provision on demand for this specific user to add the user again via Microsoft Entra ID Provisioning to SpeechLive.
If you switch from a trial account that includes the Microsoft Entra ID Provisioning feature to a SpeechLive plan that does not include this feature, Provisioning is no longer available for you. However, when you switch back to a SpeechLive plan that includes Microsoft Entra ID Provisioning, it is necessary to get new credentials from SpeechLive (Setup SpeechLive for provisioning). Users provisioned during the switch may need to be manually provisioned to work again.
We recommend to Restart provisioning if you should encounter issues when switching SpeechLive plans or manually removing a workflow users in SpeechLive (Deleting a user in SpeechLive).
Synchronization based on groups is not supported.
You can also learn more about known issues of Microsoft Entra ID Provisioning here.
As mentioned before, in some cases its possible that you (soft or hard) delete a user in Microsoft Entra ID, but it will not be deleted in SpeechLive. This is mainly the case when a user still has dictations assigned to him in SpeechLive. In that case, the user removed in Microsoft Entra ID will receive the status Invited in SpeechLive. To delete this user, the SpeechLive account administrator must sign in to SpeechLive and delete the user manually:
![[Note]](/fileadmin/helpdesk-paligo/en/../css/image/note.png) | Note |
|---|---|
When you manually delete a workflow user in SpeechLive, but provision the same user later again via Microsoft Entra ID, then this user will not be created in SpeechLive. Use Provision on demand for this specific user to add the user again via Microsoft Entra ID Provisioning to SpeechLive. |
Go to www.speechlive.com/app and sign in as SpeechLive account administrator (see User roles for more information).
Navigate to the Administration tab and choose Users.
Select the user in the list and it will open on the right side, here you can click Delete.
Depending on your configuration, you may need to take some further steps:
Automatically reassign dictations to a different user
If you have more than one typist in your account, you can automatically reassign dictations to a different typist (the same is true for authors):

